

OvidDiscovery’s innovative discovery solutions and streamlined user interfaces make searching for relevant information a rewarding experience for users.
With the growing volume and diversity of electronic resources, reducing the complexity of the search mechanisms has become critical. OvidDiscovery's modern discovery system provides users with the simplicity they are used to when searching the web, as well as the depth and precision required by academic and professional researchers.
OvidDiscovery represents the future of discovery solutions: a unified point of access to institutional holdings, pre-harvested content and external resources. It meets the needs of users who may be unfamiliar with the library’s resources and the seasoned researcher who is experienced in using discipline-specific databases. By combining the activities and results of previously standalone products, such as federated search and link resolving, OvidDiscovery provides a one-stop shop for the full range of activities, from discovery to delivery.
With OvidDiscovery, users have a single, consistent interface, regardless of the source of the original metadata, and a unified index of local, remote and library-specific metadata. The content coverage is impartial and OvidDiscovery’s search engine offers a fast response and provides relevant results with high precision.
At the heart of OvidDiscovery is OvidDiscovery’s index of metadata, which provides a broad and comprehensive web-scale search over scholarly publications metadata such as journals, books, databases, library catalogs and other repositories. OvidDiscovery’s index is pre-populated with both customers’ and publishers’ content metadata.
OvidDiscovery’s web-scale search is based on the indexed content and complemented by connectors querying non-indexed content in real time, and providing a user’s unified search and retrieval experience.
The powerful personalization features of OvidDiscovery allow users to create personal areas, with items saved in personal folders, saved searches, and custom alerts when documents matching a search string or new issues of a journal become available.
In order to access the platform, you must either:
1. Be accessing the platform from a recognized IP address; or
2. Be accessing the platform from a network that is integrated with SSO (Single Sign-On); or
3. Be accessing the platform via the Athens SSO provider; or
4. Log in with a user name and password.
If you are accessing the platform by any of the first three methods (i.e., without logging in), you can still use all three search engines freely without having to log in. You can also check if your institution has access to the full text of your items, and export or email article information. However, you will not be able to save searches, bookmark items, or receive TOC alerts without creating an account.
To log in, click on Log in in the upper right corner of any screen. The login form will appear:
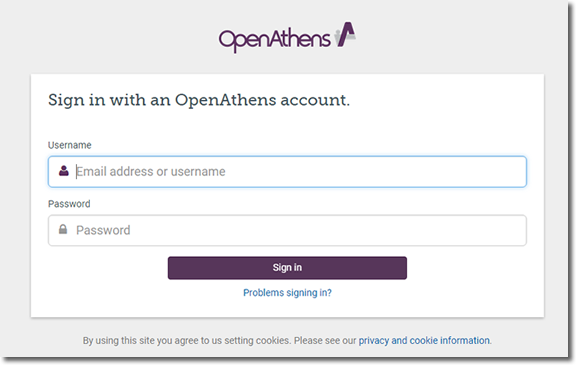
Please use your OpenAthens details to access the platform. You will have automatically your details all configured in the platform.
To log out of your account, simply click Log out in the upper right corner of any screen.
You will be returned to the search screen if you are accessing the platform from a recognized IP address; otherwise you will be returned to the log in screen.
Discover is the main search window and it is the primary method of finding articles on the OvidDiscovery database.
It allows you to search for journal articles, book chapters, dissertations, and other content types available through OvidDiscovery, as well as for proprietary content provided by your institution.
Overview
The main search screen contains the following elements:
- The text box into which the search term is entered;
- The Search button;
- The advanced search button.
As with all other screens in the platform, the upper right corner contains links to log in, log out, and/or sign up; below these are links to your user account and to the other search methods available on the platform. Some aspects of the search screen, such as its color scheme and banner, may be customized by your institution.
To access the search screen, click Search in the upper right corner from any other screen in the platform.
To perform a simple search using the default settings, enter your search term in the text box in the center of the screen, and then click the Search button immediately to the right:

The Search Results Screen will then appear, displaying those articles that include each and every word entered into the text box.
For more customized search parameters, see the Advanced Search section below.
In order to run an advanced search, click the Advanced Search option under the Search button. The advanced search options will appear:
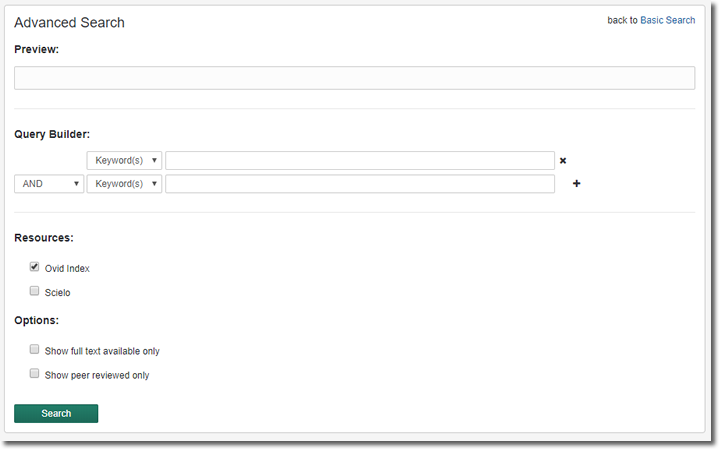
Each row in the advanced search consists of following elements:
- The middle element is the text box, into which you should enter the word or words you wish to use in your search.
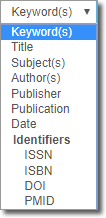
- On the left is a drop-down menu that contains a list of fields:
- Below this is a drop-down menu that lists common Boolean relationships between search terms:

AND indicates that the search term(s) in the following row must appear in addition to the one(s) in the current row.
OR indicates that the search term(s) in the following row can replace those appearing in the current row.
NOT indicates that the search term(s) in the following row must not appear in the search result.
- The last row, since it does not have a row following it, does not have a drop-down menu; instead it contains a + symbol that can be clicked to add an additional row. When there are more than two rows, all rows but the last offer an X symbol that, when clicked, deletes that row.
For example:

The above search terms will search for articles on the subject of “Endangered species” that refer to either orangutans or tigers, so long as their author is named Smith.
- Finally, there is a drop-down menu that allows you to limit your results to a given date range:
If you select Custom, four additional drop-down menus appear, allowing you to specify starting and ending dates by month and year:
When you have completed entering your search criteria, you can click on the new Search button that appears at the bottom of the advanced search window. If you wish to return to the simple search, click the – button in the upper right (which appeared in place of the + button you used to open the advanced search window).
The Search Results screen is made up of these sections:
- The central section contains the search results;
- The left third of the screen contains options for filtering the search results;
- When the retrieval of data from external databases takes too long for that data to be incorporated into the search results, the right third of the screen displays the progress in retrieving that data and the option to refresh the results with the extra data included.
As with all other screens in the platform, the upper right corner contains links to log in, log out, and/or sign up; below these are links to your user account and to the other search methods available on the platform. Some aspects of the search results screen, such as its color scheme and banner, may be customized by your institution.
Each search result contains the following elements:

- An icon indicating the source of the result ;
- A checkbox used to select multiple results when exporting or mailing them (see below);
- The title of the result;
- Additional information about the result. This may include an external link to the collection from which it was retrieved, the date on the result, the result’s author(s), and/or an excerpt from the abstract.
- A Bookmark link, only available if you are logged in. Articles you bookmark will appear under Bookmarks in the My Profile section of the platform. If an article is already bookmarked, you can click the link again to remove it from your bookmarks.
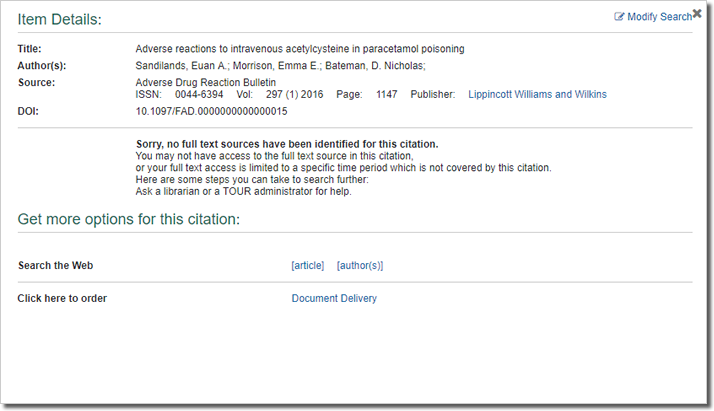
- A Record details link. This link brings up a window containing the publication details of the item. These details can include the list of authors, the ISSN, the volume number, the page numbers, or any of up to 32 other fields. For example:
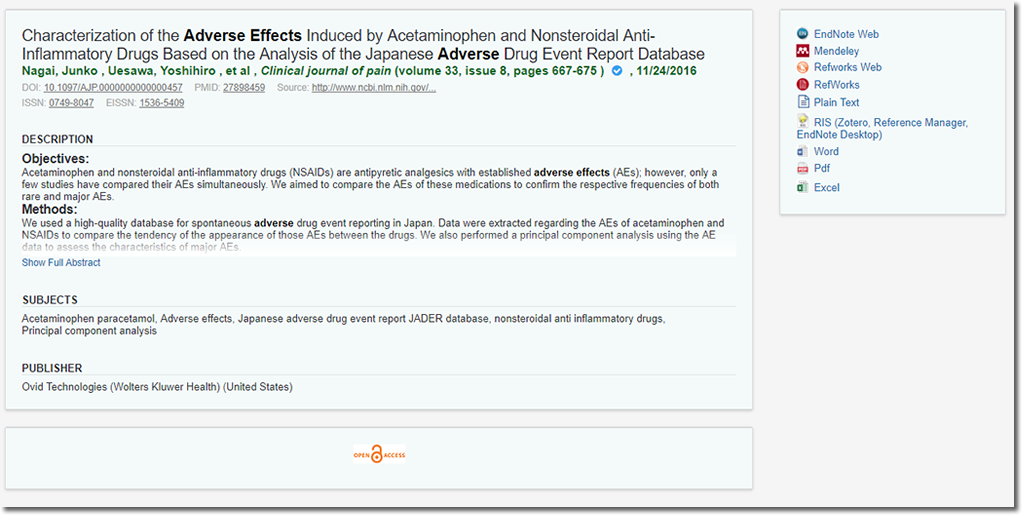
On each side of the record details is an arrow that can be clicked to access the details of the previous record and the next record, allowing you to quickly scan through all of the search results currently on the page. Click the x in the upper right corner to close the record details and return to the search results.
- A link to the full text of the item. Your institution submitted to OvidDiscovery a list of journals to which it has obtained access, and which years are covered by that access; if the item you are attempting to access is included in the list, this link will read View full text; otherwise it will read Check for full text.
When clicking the link, a small window will pop up providing details about the item and linking you to various methods of accessing the item:
Clicking on any of the links under Full Text options will bring you to a page from which you can access the full text of the item.
In addition to the full text options, you may use other means of trying to obtain the item through third parties: checking the library catalog or requesting the document via your institution’s document delivery service.
Finally, the full text window also contains links for use in exporting citations to other programs.
Above the search results is a small banner with various options (not all of these options are available to users who are not logged in):

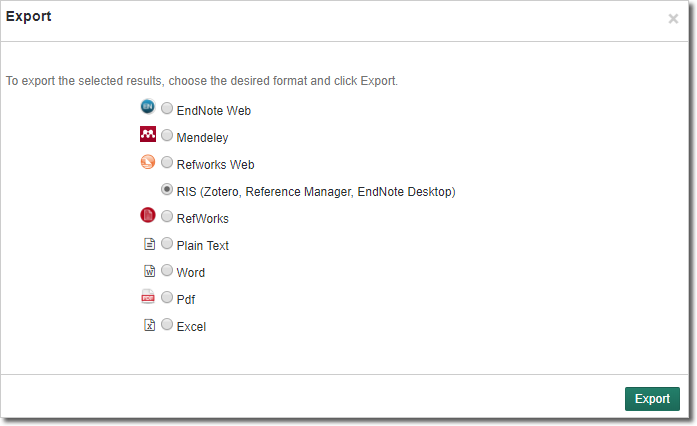
- The Export button opens a small screen with all the export options available (the order can be changed, and some options can be removed):
Select what aspects of the selected item(s) you want to export (citation information or the full details) and the format in which you want to receive it, and then click Export. You will then be offered to download a text file containing the information you requested.
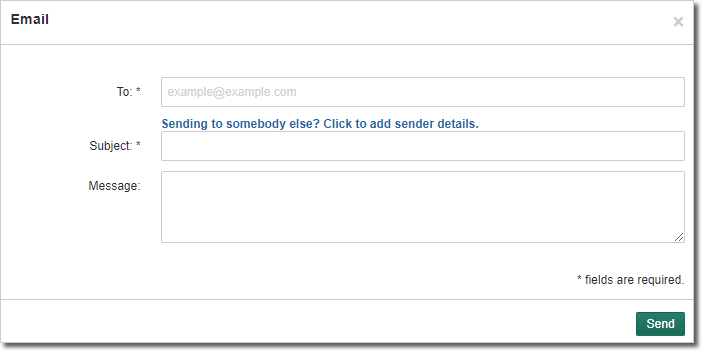
- The Mail button opens a small screen with three text boxes:
- Additional information about the result. This may include an external link to the collection from which it was retrieved, the date of the result, the result’s author(s), and/or an excerpt from the abstract.
- The Save Search link stores the current search parameters in the Saved Searches section of My Profile. This link can only be accessed if you are logged in.
- The Edit Search link returns you to the main search screen, where you can make changes to your search criteria.
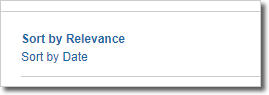
Below the banner and to the left is a Sort by option that sorts your search results by relevance (default) and date:
At the bottom of the search results are links to move back and forth between the results that have been obtained:

At all times, the ten pages immediately surrounding the current page are available to be clicked on, as are the first two and the last two. In addition, the << and >> icons take you to the immediately preceding and immediately following pages, respectively. Each page contains 20 results, and there is a maximum of 5000 results, for 250 pages.
On the left of the Search Results screen you will find two means of filtering the results: full text only or peer reviewed only. Below you have a series of clickable categories:
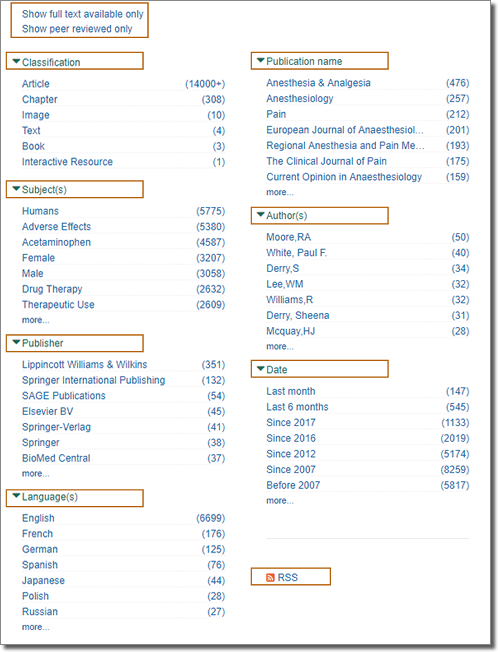
To use, for example, the Full text available filter, click in that option. This has the effect of adding that filter to your original search. The Search Results screen will refresh with the new set of results, and an icon indicating your new filter will appear above those results:

Clicking in the X of the filter will remove it. If it was the only filter, your original search will be displayed; if there are other filters, a new search will be run using those filters alone.
Some categories, such as Year, only allow one selection (because an item cannot be published in more than one year). Others, such as Publication type, remain available for further selection, because a single item can fall under more than one category (such as being both a Review and a Comparative Study).
Just as the Discover section of the platform allows you to search for individual items, Library eResources allows you to search for the resources from which those items are obtained.
The types of resources available depend on your institution; they may include journals, e-books, books, databases, or many others.
The search process is much the same for each type of resource; for simplicity’s sake, this document will focus on searching for journals, but will use other examples where appropriate.
This screen displays a search window for the default resource type, with tabs that you can click to access other resource types.
The types of resources available depend on your institution; they may include journals, e-books, books, databases, or many others.
In the sample image below, the default resource type is Journals, and any search conducted in this window will return journal results. Other resources are available. In order to access one of the other resources; simply click on the appropriate tab, e.g. e-Books, Databases.

Other aspects of the search screen that may have been customized by your institution include the color scheme, the banner, and any options or links that may appear to the right of or below the search screen.
As with all other screens in the platform, the upper right corner contains links to log in, log out, and/or sign up; below these are links to your user account and to the other search methods available on the platform.
Before you begin entering your search term, it is recommended that you first select what type of search you are conducting using the drop-down menu:

Depending on the resource selected, you might have the option to refine your search entering with the Browse by subject, where you start typing and you get the option available:

When you have narrowed down your search sufficiently, click Search to bring up the search results screen.
The platform allows you to browse through the available resources rather than running a search, by using the alphabetical selector:
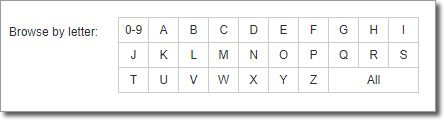
To see all the journals that begin with a given letter, simply click on that letter, or click All to browse through all the journals available.
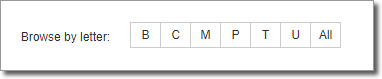
Depending on the institutional holdings, some alphabetical selectors may be missing letters if no resources begin with those letters:
The results are sorted by title. Above the table, a simple drop-down menu and text box allow you to perform another search with default parameters. As with all other screens in the platform, the upper right corner contains links to log in, log out, and/or sign up; below these are links to your user account and to the other search methods available on the platform. Some aspects of the search results screen, such as its color scheme and banner, may be customized by your institution.
A sample search result might look like this:
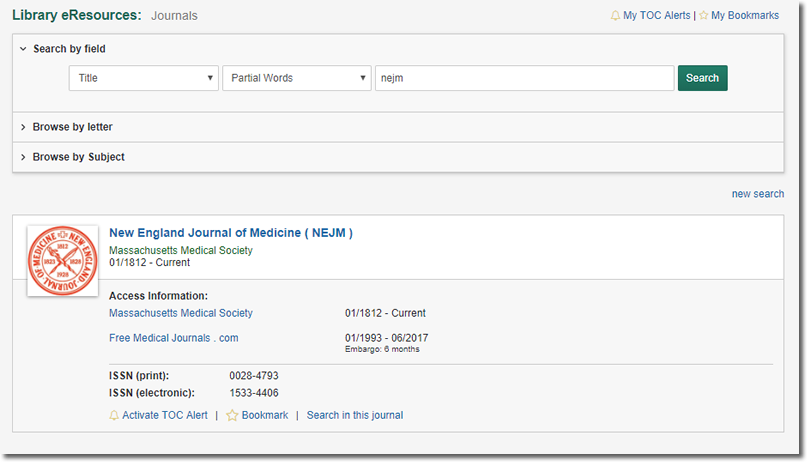
Below the title of the result, information is presented– publisher name; access information details and links to the websites that offer the text of the journal; the publication periods that are available at each link; the journal ISSN.
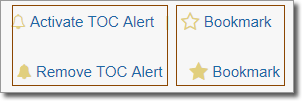
Below the title access information, you are given the options to add the resource to your My Profile bookmarks list, or to enable TOC alerts if these are available.
You can expand any of the results by clicking the plus button next to each box:
The Citation Matcher is an exact article finder.
It is designed for use not when you are searching for many articles on a given topic, but rather for when you have a specific article in mind and enough information about it to help you locate it accurately.
This screen displays a search window for the default article type, with tabs that you can click to access other article types.
The types of articles available depend on your institution; they may include journals, e-books, patents, dissertations, or many others.
In the sample image below, the default resource type is Journals, and any search conducted in this window will return journal article results. Three other article types are available: e-Books, Patents, and Dissertations. To search for one of the other article types, simply click on the appropriate tab.
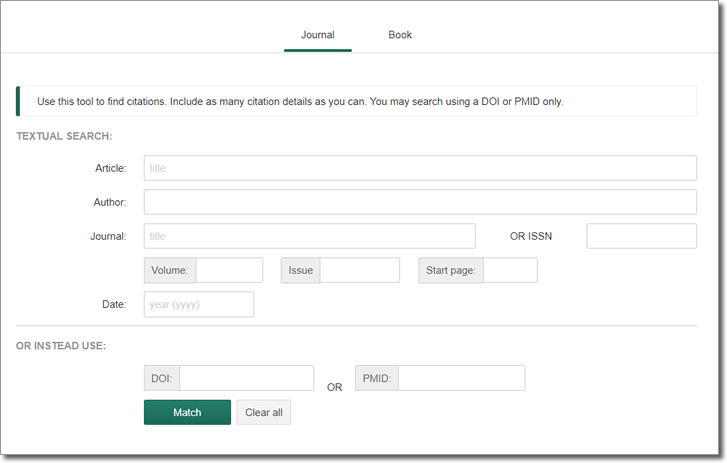
As with all other screens in the platform, the upper right corner contains links to log in, log out, and/or sign up; below these are links to your user account and to the other search methods available on the platform. Some aspects of the search screen, such as its color scheme and banner, may be customized by your institution.
Each type of article has its own customized set of fields that you can use to locate articles. Journal articles, for instance, may allow you to enter ISSNs, the issue number, or the page on which the article begins; e-Books may allow you to enter ISBNs or the edition number; while patents may allow you to search for the inventor’s full name or the date or country in which the patent was issued. The exact fields available will depend on the article type and your institution.
As you enter information into a search field, the platform will automatically bring up a list of items that match what you are entering. At any time you can click on an item in the list, and all the fields related to that item will be filled in. For example, clicking on the title of an individual article will automatically fill in all or nearly all of the fields in the search form; clicking on an ISSN, however, will fill in the ISSN number and the name of the journal only.
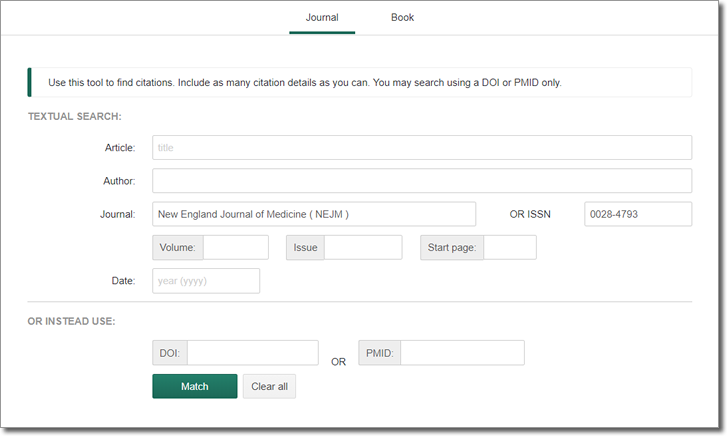
It should be noted that the suggestions provided by the platform are based solely on the information you are currently entering; it does not take information already present in other fields into account. Clicking on a result, therefore, may erase the information present in other fields and replace it with information about the result on which you clicked.
If you wish to quickly erase all fields and start over, click Clear all.
Once you have entered enough information to uniquely identify one single article in the database, you can click Submit to bring up the result. You will be presented with a window offering you various methods of accessing the item:
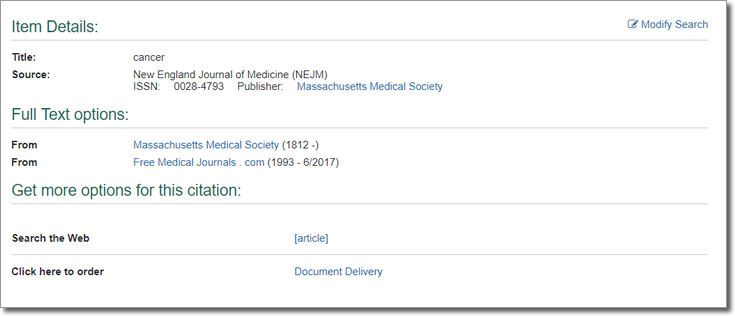
Clicking on any of the links under Full Text options will bring you to a page from which you can access the full text of the item.
In addition to the full text options, you may use other means of trying to obtain the item through third parties: checking the library catalog or requesting the document via your institution’s document delivery service.
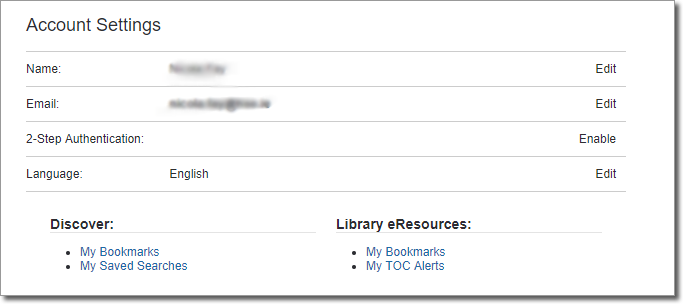
My Profile is the portion of the platform that stores information relating to an individual user.
It can only be accessed if you are logged in. To access the various portions of the My Profile section of the platform, click on one of the tabs across the top of the screen: Personal details, My Saved searches, Discover Bookmarks, eResources Bookmarks and TOC alerts.
The upper right corner contains a link to log out; below this are links to your user account and to the other search methods available on the platform. Some aspects of the search screen, such as its color scheme and banner, may be customized by your institution.
The Personal Details screen allows you to edit your first and last name and your email address, information that was inherited from your OpenAthens account.
To edit your details, please use your OpenAthens account configuration page.
If you have saved a search in the Search section of the website, you can choose to receive daily, weekly, or monthly emails regarding new entries that fulfill your search criteria. These emails will be sent to the email address listed in the Personal Details screen.
Each saved search consists of the following:
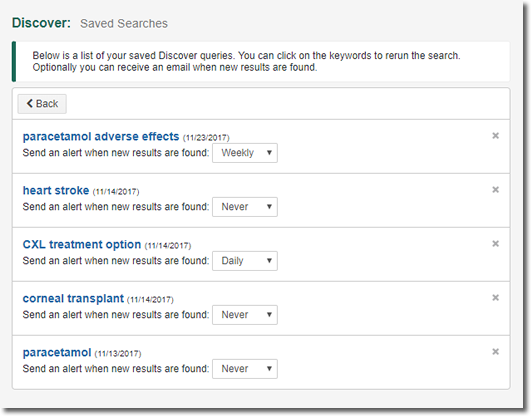
- A link to the search results;
- A drop-down menu that lets you choose how often you receive emails alerting you to new entries among your search results: Daily, Weekly, Monthly, or None;
- An X button that removes that item from the list of saved searches.
If you have bookmarked articles in the Discover Search section of the website, you can quickly access them here.
Each bookmark contains the title of the bookmarked item, additional information about the item, a link to the Record details, A Check for full text link, options to Export and email the bookmarked citation.

To Delete a bookmarked result, mark the checkbox next to each item to select it and click the delete button.
This section provides a list of the TOC alerts to which you have subscribed from the eResources Search Results screen. For each TOC alert, the name of the resource appears, as well as the ISSN, and the publisher.
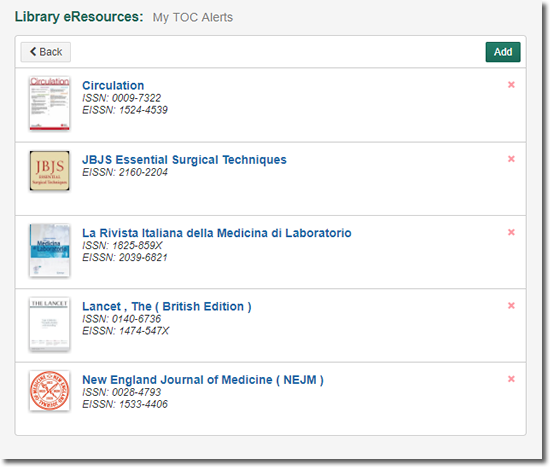
If you want to unsubscribe from receiving TOC alerts for a resource, click the X sign for that entry.
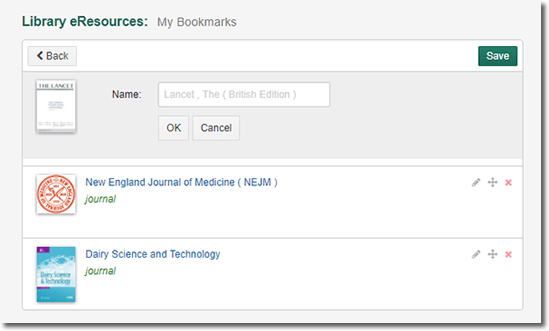
If you have bookmarked an item (journal, book or other) in the Library eResources section of the website, you can quickly access them here.
Each bookmark contains the title of the bookmarked item, a link to the item in the A-Z list and the full Access Information of this item.
You may change the title of the item using the pencil sign. You may change the order of the items in your bookmarks list using the arrows sign. To Delete a bookmarked item, click the X sign.
The names of the items and their order, as you set it will be reflected in your home page as part of the eResources Bookmarks widget.
Your Bookmarks list will be presented and available each time you log in to the system.
Please note that your institution may or may not provide this widget.